Showing posts with label party plans. Show all posts

Monday, November 8, 2010

Pumpkins of Late


We went to a spectacular Pumpkin Carving/Costume party. It was so fun! I love seeing creative costumes and everyone that comes! So here are a few pics of the wonderful pumpkins that we managed to carve and scrape....
Messy, messy.


Just couldn't give up the pumpkin.The rest of us just carved it up!!!!

The men really dove into this project. We weren't even keeping score.
....such talent!

Wednesday, July 7, 2010

Patriotic Party

And the Patriotic Party Begins!!!!
We had a slight adjustment to the party as the hurricane came all the way up from the coast and visited OK just as our day began. Soooooo, we moved it into the garage instead...no amount of rain was going to damper this party!

Banners up and table clothes down, we set the place up for buffet food, BBQ style.

Ken made a Bacon Explosion for all to enjoy.
Yes, he wove the bacon together and wrapped bits of bacon inside the sausage then rolled all of that together. I think about 1 bite of this is the equivalent of 2 Bic Macs but it's so good! All you really need is one bite, with lots of BBQ sauce Head Country style!
I made these corn cakes out of Southern Living Farmers Market Cookbook (link under Book List).
We were so excited to get the most absolutely fresh corn from a friend and, oh, you could tell! It was sweet and plump with juices.

I made Strawberry/Blueberry Jam for all of our guests to take home as a little token of red, white, and blue joy.


The little girls painted their nails for this perfectly patriotic occassion.

It had rained until about 5 so we don't have pictures of all the guys huddled around the smokers and sopping the homemade rubs on everything but it was awesome. After indulging in the wide array of food, we lit fireworks and enjoyed the cooled off evening. Since it had rained all day, the grounds were damp and completely safe, the air was cool and light, so we were able to sit and relax and share company with all who came.


I'd like to thank all those in the military and their families for their ongoing service. And I highly recommend learning what the founding fathers went through by the series John Adams. It will enlighten you!

Thursday, June 17, 2010

Patriotic Process

Next step in the Patriotic Process...getting the flags assembled.

After sewing the flags together, I turned the them right side out and poked the point with a dull pencil so it would have that nice finish. I pressed the flags with an iron for sharp edges. I highly recommend that when you get your sewing machine out, you turn on the iron. It really makes a difference when you press your pieces after (or sometimes before) you sew.

I took bias tape and folded it over both pieces of the flag. What did I do wrong? I think I should have paid the money and gotten the widest tape they make because this was very tricky to work with something so small.

It turned out fine and once I got a rhythm going, it went pretty fast.

You can see here how narrow this bias tape really is. I couldn't even pin it to the fabric.

I also had all the flags ready to go so I could slip one in right after the other so it went smoothly.
....and it worked!

This is one strand of bias tape that measured 3 yards. I left about 12 inches on each side so we would have room to tie the flags up. I'm not sure yet where we are putting these so I need to be flexible.

Tuesday, June 8, 2010

Patriotic Flags

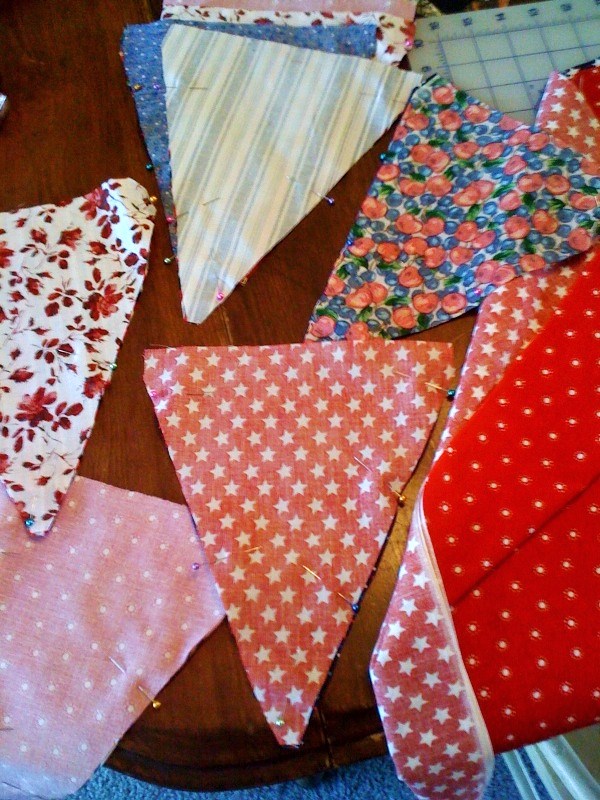
Here is the process of the flag making. I laid out several pieces of fabric on a self-healing cutting board. Then I laid the template for the pattern (the size of the flag with the dimensions of the seam allowance included - 1/4 inch) on top and drew the triangle with a fine-tip sharpie. Why use a sharpie? It's easy to see and when I sew all of this together, you won't be able to see the ink. Using a fine-tip sharpie is better as it bleeds a lot less than a traditional size sharpie. Don't do this on anything you're going to wear! That would be a big chance you're taking.

I pinned the pieces together just so they wouldn't slide everywhere while I was cutting.


Then I started pairing up "random" pieces making sure I don't have two stars or two stripes side by side. It's looking cute!!!!

Wednesday, June 2, 2010

Patriotic Preview

This fabric represents a party. Yes, a 4th of July party. I decided to chronicle this project as I'm going through it, instead of lots of pictures at the finale. This way, if you decide to do anything for your party, you have some inspiration and, more importantly, some time for completion. When I look at other blogs and see the finished product, I always think, "what a great idea, I should have thought of something like that." So here's your chance sister!I will be making a long string of flags out of this fabric. I want to string it up around the tables where we'll be hosting the "smoke-off" of great food and fireworks at dusk.
Let's start with the table clothes. First, I want to show you how to square your fabric. I bought this ticking in red and white for table clothes for the party. It's 60 inches wide and 9 feet long. I wanted it to hang over an 8 foot table, at least 6 inches on either side. When they cut the fabric at the store, they don't always cut it straight. Now they try, don't get me wrong, but you really should make it straight when you bring it home.

I wasn't sure how long the tables were so here's a trick that you can pull off...put multiple tables together and overlap the pieces to get the right length for the entire table. Line up the stripes so it's a continuous line and that will make it work.


Use a cutting board to line your fabric up. I use a very inexpensive board made of cardboard for about $5. It's huge when you fold it out and I've used it for years! Just be careful to only use scissors; a rotary cutter will cut right through it.

Line up the selvage (the long white strip where there's no pattern) along one side of the cutting board and follow a guide line straight down the perpendicular side. I used pinking shears (scissors with the triangular teeth) because I didn't want to sew a finished edge but I also don't want it to fray. Plus I just think shearing is charming for a casual party. At this point, I'm not even going to finish the selvage edges either. Our party will be country charm with an ounce of patriotic posh. I'll save the technique for the catchy eye-level items.