Monday, September 26, 2011

Autumn Bunting - Part I


Ahhhh, the colors of fall! It's such a wonderful invitation to a new season. I love the new modern fabrics and prints available today. Traditional is good but something new is so fun too!


Here I've made several triangles about the size of the flags you see at car sales lots and open houses. These are much more enticing and last a long time. You might remember the patriotic bunting I did last summer and it's on my agenda to have one for every season so I can enjoy the colors and patterns for every part of the year.


Ok, I recycled a piece of cardboard and made my measurements.

It's good to mark the correct measurements on your template so you always have your directions right there. And...in theory...it might not get thrown away because there ARE measurements written on it. Another story, another time.


Lay several already pressed pieces of fabric on top of each other with a self-healing cutting board underneath. With a rotary cutter, and a steady hand, cut around your template pressing through all layers. Please pay the money to have a sharp blade on your cutter. It is so irritating to pull your fabric only to find it stuck by little fibers that weren't cut. My measurements were around 7 1/2 inches wide and 9 inches tall. It really doesn't matter as long as they are all cut the same.


Once you have all of your triangles cut, you put two pieces together and randomly alternate where you put each piece. I think I usually have about 18 pieces and that makes about 6 yards.

It doesn't matter if you have duplicate fabrics right next to each other or if you selectively put "random" together. Yes, I meant to say that...random is actually methodical.


Once you have these pieces ready, flip the fabric around to right sides are facing each other, line up your points and begin sewing at one end. No need to pin this together because it's not very big and is not going to be worn (that's when the measurements really matter). Don't sew across the top quite yet, we will sew that in another step.


Sew with a 1/4 inch seam from top right, down to the point, pivot your needle (with the needle in the fabric to keep it in place) and then sew back up to the top left.


Do this with each piece....more to follow on completing this bunting!

Thursday, September 15, 2011

Tea Party Delight


What's better than tea for two? ...tea for two little girls!


I love watching little girls play "ladies" in a real tea room being served delicacies on little plates with hot tea!


We've been to the tea room numerous times but this was a first for my niece and we celebrated her birthday, just girls, together and undistracted.


Ok, so we weren't completely dressed for a tea room visit but it was still good...because they didn't even notice! But, when asked what hat they would like to wear, they swarmed the hat basket to pick out the perfect match. So cute!


Here we had an array of choices. I can't even begin to describe these beauties of food the way our wonderful server described them. She threw in lots of adjectives and careful instructions on what was the best way to eat each of them. Then she left and we just tried it all. Who knew food could be so delightfully rich and tasty? ...well I guess the tea room knew!


Ok girls, go slow, I promise the server will not take all your goodies away until you are finished with them!


I have to say the cucumber sandwiches were a real hit, along with the melon balls with mint, and the biscuits with chocolate spread. My mouth is watering~

And here is what satisfaction looks like! After the tea room visit, we strolled outside the gardens and enjoyed the contentedness of a full belly, good conversation, and relaxed environment. So wonderful! Cherish these moments while your girls still want to be around you!

Wednesday, May 18, 2011

My Journey Through Quilting - Phase I

Let me start with "I've never made a quilt before." Now let me tell you that I've been scared. Yes, I'm very apprehensive about making a quilt. I have lots of friends that just whip these babies out while I think to myself "how did they do that?" I've been in love with Amy Butler fabric for a long, long time and I found the perfect starter quilt pattern drenched in Amy Butler!


The quilt is called Amy's Lotus Brick Path Quilt...


http://www.amybutlerdesign.com/products/free_patterns.php


This pattern is free (that's amazing in itself, thank you Amy) and it is truly a beginner quilt. Why? There isn't a binding around the edges, just finished edges, which is so awesome! Another reason this is a beginner quilt is that none of the points, or corners, match up, another awesome. So far? Easy + easy = easy. Please don't mistake easy for fast. I didn't say that, but the work is doable! I've been working for a long time on this quilt and I can say it's "easy" to put away when needed then pull it back out and continue where you left off.


The pattern says to cut out lots and lots of "bricks." There's my 1960's tank of a machine in the background. It seriously weighs about 50 lbs! I can't talk and carry it at the same time.


I've started putting the cut pieces together ....whoa, whoa, whoa. I need to back up. This is a "random" quilt and there is a method to the madness. My mom and I worked really hard at arranging the randomness before I ever sewed two pieces together. She told me that I have lot of blends of colors (that's good) and a few pop colors (also good.) So, all we had to do was make sure I didn't have too many of the same styles of blend fabrics together, i.e. no dots with dots or stripes with stripes. Then we took the pop colors and started placing them at wide intervals around the quilt. Step back and look, defocus your eyes a little and you'd be surprised how easy it is find the void that needs some "pop" color. I labeled at the top of each row what number row it was and then stacked the pieces starting on the upper left, straight down, then row 2, straight down, etc.


Here's the top of row 3 with a half piece as the start of the row (it's not cut just folded over.) I sewed each piece, just like I picked them up, starting with row one, piece one. With a 1/4 seam allowance I sewed all the way down one row (set aside with the sticky still on top of the row.) I kept sewing until I got all 18 rows done. Time gauge = 5 rows in 2 hours approximately.


PRESSING MATTERS! You must get your iron out and press your work. Some people hate this part but I love it because it gives that finished look with one swipe. The seams need to be told which way to go and that's what the iron does!


1st row - press seams down


2nd row - press seams up , etc.


- or - press odds down, evens up


whichever works better for your brain


This is a different angle but you can see the sticky notes along the left side of the picture (which is actually the top of the quilt.)


When you put the rows together make sure the seam of the first row pieces are in the center of the second row pieces. To double-check yourself, fold a "brick" in half and mark with a sewing marker then match that up with the seam on the other row. This will stagger the rows but keep the measurements aligned so the whole thing matches up. You want to press the seams away from the center. I promise, it's worth the work. Since I don't know all of the little quilting techniques, my mom told me to do and so I did it like that. Mom was right, here's how the diligent work turns out.


This is the top of the quilt. Notice the edges are staggered and will be trimmed and all sticky notes are removed (except for row 1 as a guide.) Also notice the blend colors and the pop colors. I want to use the quilt just like it is but I'm going to see this through and finish the task.


Watch for Phase II...

Tuesday, May 17, 2011

Dress Saga Completed

After all the amateur photos... here's a much better depiction of the dress from a professional's eye. Thanks, Dejah, nice job!


http://dejahquinnphotography.blogspot.com/

Monday, May 16, 2011

The Dress Saga

Yes, the dress saga. This has been a challenge for me because, as usual, my brain and heart believe that I can do things before my body can actually execute them. I'm a dreamer, an idea giver, and an idealist. Ok, so now you know....and the story begins.


A friend of mine wanted to do a 1950's photo and needed some fun dresses. I went to Salvation Army and it was one of those light-shining moments on the rack of discount city that I found 2 dresses for $12.99 each. I grabbed them and said this can work!


Well, they need to be shorter to be 1950's so the hemming begins.


....and continues, and goes on and on.


Let me put this plug in - when I do things for other people, I'm even more dedicated to perfection than for myself. That usually makes me more frustrated and the other person doesn't even seem to notice anyway.


My good friend, Faye, said that trimming a dress is just like cutting hair.


You have to start from the underneath and get a guide then work your way out. T-r-i-c-k-y! We tied up the layers with string and used binder clips to keep them up and out of the way. The tough part? When you let the layers down you can't see the underside. So Lily and I got out the ruler and diligently marked the cut-off hem at 10 1/2 inches. Let me rephrase that - Lily got shoved under the layers (in the most loving and encourageable way) with a ruler and a marker so she could start marking the measurements about every 4 inches - all the way around. This went on and on. I didn't think about how many layers there were on this dress (actually, each dress). We got tired after about 4 layers of measuring.


Little trooper.


Side bar note, Lily and I love to watch Project Runway together. So please don't report me to the services for child labor. She actually likes helping me!


Wow, lots of work, but it's worth it. And I have to say that I love the challenge of things. I would never have asked myself to do this so I appreciate the fact that other people help make me better at sewing, through trial and error, and accomplishment.


Can't wait to see these beauties in the photo shoot!

Wednesday, May 11, 2011

Repurpose / Recycle

New project this month! As part of the sewing club (our cute little local 4-H sewing group) we did a lesson on making something out of nothing. These cleaned out ice cream containers were the basis of our project. I got a bunch of them (for free) and brought them to the club. We did some quick measurements, got out the fun fabric and turned these babies into decorative trash cans or, for more the more advanced girls, a sewing caddy with a drawstring. Neat idea origination? HA! My dad! He made my mother a knitting caddy when they were in high school. My dad is an engineer and loves math so it makes perfect sense to me. Thanks, dad!

Blue Bell containers and and excited Lily ready to sew!
....determined look on her face.

I don't have many pictures of the middle part of the class because it's so hectic with all of these precious questions and enthusiasm that I can't even stop to get my camera. The students were to measure the circumference and cut a rectangle to match the container. Then they sewed the two ends together (right sides together) and then pressed the seam open. Next was a 1/2 inch hem and the top and the bottom. Last, slide the "tube" of fabric over the container and embelish to taste. Here are some of the finished products. You can see the creativity come out in each one.

She's 7 and finished her first trach can. She picked the fabric and ribbon herself.

This one is a teen-agers. LOVE IT!


Lily really wanted her namesake on it. So no one could steal it!


"Yep, that's mine."


Here's the sewing caddy with a drawstring. We just lengthened the "tube" and did a 1/2 inch hem then a 2 inch fold over. We also added a circular bottom so the container would be supported with the weight of sewing what-nots thrown inside. With extra fabric she made the matching drawstring. Really amazing job!


I love doing this! Sometimes I forget how awesome it is to watch someone get so proud of their creation. There's more to come!

Monday, April 25, 2011

Retro Highchair

This adorable highchair was found at the local antique shop. We have some amazing ones around here and this was a real steal! It needed a little work but I was up for the challenge. Actually, let me back up...my sister-in-law (sweet and over-ambitious Katy) spotted this bute, bought it, took it home, had to explain to hubby why she bought a rusty highchair for the baby, then put it in the storage shed. I arrived and asked about the chair in which she directed me to the backyard. Ugh, I couldn't stand the idea of it not being used because it was adorable! So, I brought it back to Oklahoma, did a little magic and took it back to Albuquerque. yweh!


Ok, metal 101, this highchair had rust. I took a wad of aluminum foil (yes, from the kitchen) and used it like a sponge and scrubbed over the metal legs and arms. It took a little elbow grease but the results were immediate, hence, I kept working. You would not believe how shiny metal can really be!


There's the wad on the floor.

There's the yucky rust.


And now, shiny and new. I painted the tray again to seal it up and make it look nice. I do have to remind you that the "baby" is actually 18 months old and has a plate. just sayin'


Thursday, March 31, 2011

Recovered Chair

My mother-in-law was so sweet to pass down this chair full of potential. It doesn't show the comfortability that I know so well but it's there! I'm thrilled to have it and it's definitely a family momento...it's been passed around several of us. The fun part is how to make it even more wonderful! So, here we go! I got some "hot" fabric at our local Hancock's and LOVE IT!

I took some basic measurement and charted it out on a sheet of paper. I think the hardest part of turning measurements into patterns is how to buy the yardage. I struggle with this and often have to ask those information gurus at the fabric store what to do. They are so helpful and make me feel good about what I'm buying. So, laying out the pattern pieces (in my head) we came up with what I needed. I really just followed what was on the original cushion with a small adaptation on the zipper.


Buy good fabric!!! You WILL need to wash it! No matter how careful you are, no one else will be as careful as you! (Case in point?....daughter with dirty feet)

Here's how the back turned out.


The front shot...

It's too cold right now, but picture this on the porch, you reclined effortlessly, with a wonderfully chilled drink on a hot summer afternoon, and sunglasses on so you can take in all the brightness around you!!! It will be here soon.


And, here's the little pillow in case sleepiness happens to follow!

Wednesday, March 30, 2011

Heritage Project

So, we've been working on so much lately! One thing we've been working on is Kenny's Heritage Project. It's a class project meant to go through your ancestry and talk about the country your family originated from. This stuff is so fun and I loved watching Kenny's eyes light up when grandpa, or great-grandpa, would tell him something about the family that he never know.
We decided to follow my husbands side because they came to America within the last 100 years. I'm Irish and Ken is Irish/Italian/Polish. Grandpa was a New York Italian so he's wonderfully animated when he gets mad. Irish=mad but Italian=expression! Here's the fam!....or I mean...FAMILIA!


...from the boot to America!


And the pride of every parent! Great job, Kenny!!!!

Wednesday, February 23, 2011

Pom-Poms, Baby!

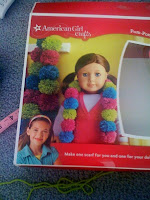
Pom-pom city, baby! My daughter is working on her project that she got for Christmas. It's a pom-pom scarf, one for her and one for her doll.

It's an American Girl product that I got at our local Hancock Fabrics Store. It's the cutest thing on earth. Super easy, bright colors, wonderful directions.


We got out the instructions and tape measure. Lots of measuring going on to ensure that each pom-pom is the same size (to begin with anyway).


She got a little excited about the scissors and the shaping, so some pom-poms came out a little smaller than usual. I feel her pain, when I trim...there's one piece and then one more piece, etc.


These are the awesome forms that came with the box. The larger one is for girls size pom-poms and the teeny one is for the doll's pom-poms.

I think the challenge here is not how hard it is to make pom-poms (because they are really easy and sort of fun) but it's the amount of pom-poms needed to make these scarves. So along with the lesson of sewing and crafting is the lesson of patience and diligence. We have to be patient to give all 26 pom-poms the same amount of care and we have to be diligent to do ALL 26 pom-poms. I guess there are hidden lessons inside of everything you do and I want to teach her the joy of finishing the project along with the journey to get there.